You are here: Working with Projects and Datasets > Types of Datasets > Local Files > Datasets: Text Files
Datasets: Text File
 Video tutorial available.
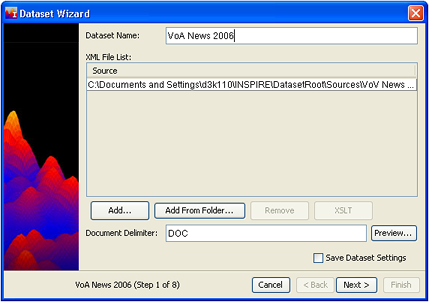
Follow the Basic Steps 1-3 for creating a new dataset. The following Dataset Wizard screen displays:

- Enter a Dataset Name.
- Choose source files by adding files to the File List. To add a single file, click Add. A Windows file chooser window opens. Browse to the file you want to add. To add all the files in a folder, click Add From Folder. A Windows file chooser window opens. Browse to the folder of files you want to add. Make sure that the folder itself is selected when you click Add Folder.
 A common error is to open the folder (which means you are now in the folder you wanted to add, rather than simply highlighting it).
- Set the document delimiter to the text which separates one record from the next in the document(s) in your dataset.
- To save your dataset settings, select the checkbox (lower right). Click Next.
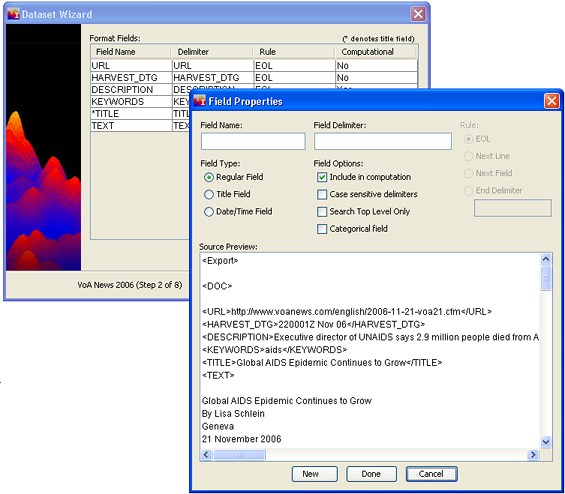
- The Format Fields screen appears. Define a field for each field you want to use in your analysis. For more about how to define a field, see Defining Fields. When
you have defined all of the fields, either:
- Click Next and go to Optional Settings or
- To start processing using the default settings, go to step 9.

- Click Finish to start processing. The Processing dialog opens, informing you that the dataset is being processed. Click OK. The dataset name appears in the list of datasets in the Dataset Editor window. You can monitor its status as it is processed by clicking the Refresh button at the top of the Dataset Editor window. When its status is "Available", you can open it.
 If for any reason processing fails, examine the log to troubleshoot what went wrong. Open the log window from the Dataset Editor by either clicking the Status button or by right-clicking on the name of the dataset and choosing Status from the right-click menu. The Status window will open, showing warning and error messages for both pre-processing and processing steps.
![]() Video tutorial available.
Video tutorial available.
 A common error is to open the folder (which means you are now in the folder you wanted to add, rather than simply highlighting it).