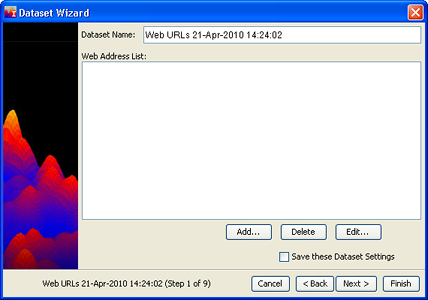
If you know the URL's of web sites you want to harvest, the Web Harvest option is the one to use. Follow the Creating New Datasets Basic Steps 1 and 2, choosing "Web Harvest". The following window will open:

Enter a Dataset Name.
The Web Address List is a list of URLs, one per line, of the web sites you wish to harvest. You can:
Add an address to the list. To add an address, click the Add... button. The New URL window opens. Enter a web address and click OK.
Delete an address from the list. To delete, click on the address you want to delete, and click the Delete button.
Edit an address in the list. To edit, click on the address, then click the Edit... button.
When your list is complete, click Next >
to go to Step 3, or to accept the default settings and begin processing
immediately, click Finish and go
to Basic Step 12.
 If any of the web sites require
authentication (in other words, if you must log in to the site using a
username and password), go to Step 3.
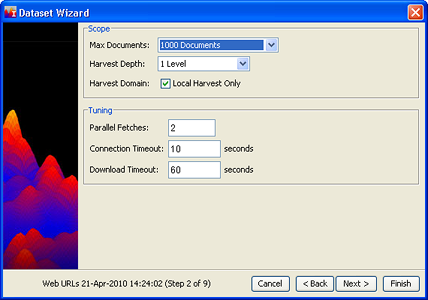
The following window opens:
The settings on this screen serve as controls for the duration of a harvest and can be useful if you are experiencing any of the following problems:
An excessive number of documents is being retrieved.
Use the Maximum Documents drop-down to set a reasonable number,
and the harvest will be terminated when that number is reached.
The harvest retrieves "linked to" pages
that are not relevant to the analysis.
Specify a Harvest Depth of 1 level, which means that links from
the top level pages will be followed, but links on those pages will not
be.
You aren't interested in web pages outside the web sites in your Web Addresses List. Click the Local Harvest Only checkbox.
Harvests seem to take a long time to complete.
Parallel Fetches asks you to specify how many web servers you want
to be downloading from at the same time. Clearly, if you have the processor
power, having a number of parallel fetches going at once can shorten the
harvest time. Attempting too many parallel fetches can actually slow the
harvest, however.
Frequent connection timeouts.
Connection Timeout refers to how long the harvester should wait
for a reply after it has contacted a web server. If you are experiencing
frequent connection timeouts, you may want to increase the timeout interval.
Pages with very large graphics or slow or overloaded
servers.
Download Timeout limits how long it may take to actually download
a web page, and insures that the harvest won't get stuck trying to fetch
a page from a very slow or unresponsive server.
One of the weskits on your Web Addresses List requires
authentication (you must log in with username and password). Enter the
User Name and Password on this screen, and they will be passed through
to the web site during the harvest.  Multiple user names and passwords are not supported.
When you are done, to accept all the defaults on the following screens and start processing immediately, click Finish. To set filters, click Nexty>and go to Step 5.
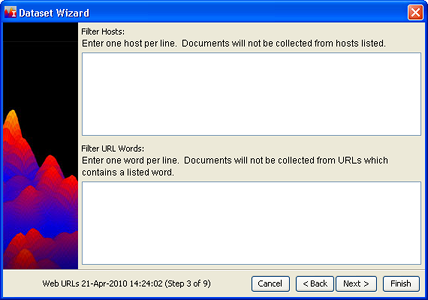
The Filters window appears:
Filters help you to deal with the following problems:
A large site which you know contains pages that
are not relevant to your analysis will dominate the harvest and obscure
the pages which are most interesting to you.
A "host" is a web server; its address appears in the
URL for a page, immediately after http://. For example, if the URL is
http://www.amazon.com/stores/books, the host is "www.amazon.com".
Enter names of hosts you want to avoid in the Filter Hosts box, one per
line.
Your search terms include words which have several meanings, only one of which is interesting for the analysis, or you may want to exclude certain sections of web sites (on-line catalogs, for example).
Enter hosts or URL words to filter, click Next> , and go to Optional Settingsor to use the default settings for the remainder of the options and start processing immediately, click Finish, and go to Basic Step 12.
The Processing dialog opens, informing you that the dataset is being
processed. Click OK.The dataset appears in the list of datasets in the Dataset Editor window.
You can monitor its status as it is processed by clicking ![]() , the Refresh button,
at the top of the Dataset Editor window.
, the Refresh button,
at the top of the Dataset Editor window.
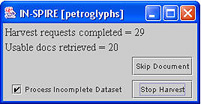
The progress of the harvest is reflected in the Harvest Progress window:

Harvest Requests Completed is the number of requests the harvester has made and completed; this number will not be the same as the number of Usable Docs Retrieved. There are several reasons why a request does not result in a usable document:
The request failed (not found, nothing was returned, or the request timed out).
The page contains only links to other pages.
The page is not decipherable (unexpected data format, for example).
The page is missing specific required tags (at certain custom search sites such as FBIS).
All requests that result in unusable data are logged in the HarvestLog.txt file, which can be found at C:\Documents and Settings\<username>\INSPIRE\DatasetRoot\<dataset handle>\Harvest\HarvestLog.txt. The default datatset handle is "00000003". The default location for INSPIRE is C:\Documents and Settings\<username>\INSPIRE. If you have installed IN-SPIRE in a different location, look there for the HarvestLog.txt file.
If the harvester appears to be "stuck", force the harvest to move on by clicking Skip Document.
If the harvest is proceeding very slowly and the number of usable documents retrieved is sufficient for a visualization, make sure the Process Incomplete Dataset checkbox is selected (checked), and click Stop Harvest. The process of developing a visualization continues, and when it completes, a Galaxy will be available for the documents that have been harvested.
If the harvest is returning very few usable documents and you would like to revise the URL list or other harvest settings, un-check the Process Incomplete Dataset checkbox, and click Stop Harvest The harvest stops and no visualization is developed for the documents already harvested. You can then edit the dataset settings and reharvest.