You are here: Tools > Search Networks > Search Networks: Building a Network
Search Networks: Basics
A search network is a replicable series of searches, especially useful if you find yourself doing the same search or series of searches over and over. Search Networks are frequently used to examine Real Time data, for example.
Accessing Search Networks
On the main menubar, click  and from the list that appears choose Search Networks. Alternatively, choose Tools > Search Networks.
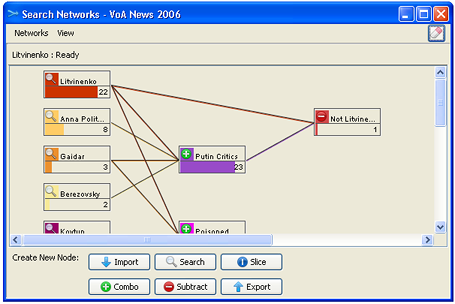
The Search Networks window opens. The image below shows the "Litvinenko" network supplied with the VoA News 2006 dataset. If your dataset has no network yet, the window will be blank. See Creating a New Network.
 If the Search Networks button does not appear on the toolbar, you will need to turn on Search Networks in your IN-SPIRE Preferences file.
Types of Network Nodes and How a Network Works
As the buttons at the bottom of the Search Networks window may suggest, there are four types of network nodes: Search, Slice, Combo, and Subtract.
-
 A Search node is a search like one that might be created with the Search tool. It may be more or less complex. Every network requires search nodes.
-
 A Slice node contains a subset--a "slice"--of the documents in the node from which it is created. Relevance can be described as how strongly a document is related to the search terms which retrieved it. A Slice node is like a filter that filters out less relevant documents.
-
 A Combo node adds together the outputs of two or more other nodes.
-
 A Subtract node combines two nodes by subtracting the documents that occur in both, the intersection of the two nodes. It outputs only those documents that occur in one node but not the other.
Any network needs one or more Search nodes to bring documents into it. The network helps you refine the results of the searches down to just the information that's analytically interesting.
The flow of information through the network is from left to right, through the connections drawn between the nodes. The connections can be created when you create a new node, as in the case of a combo node, or you can draw them manually. You can adjust how the nodes in the network are laid out, but generally it is simpler to let Search Networks arrange network nodes for you.
It is possible to both import search queries and export the results of a search network.
Creating a New Network
You can create new search nodes or import any group that is listed in the Groups Tool.
Choose Networks > New Network. The network panel is cleared and a prompt to open a saved network or build a new network appears.
Create a Node by Importing an Existing Group or Creating a New Search
To import an existing group
- Click the Import button
 . The node editor panel appears below the network panel and any existing nodes are temporarily disabled; they cannot be moved or edited while the editor is open.
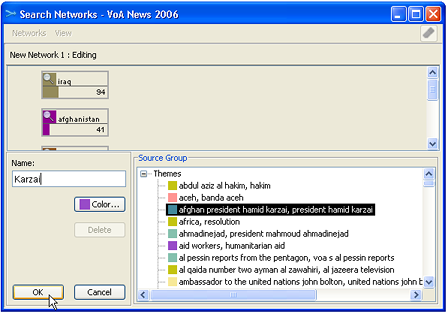
- Choose a group from the Source Group list, which will include all of the groups in the Groups Tool.
- Name the node.
- Change the color of the node if you'd like, by clicking on the Color... button.
- Click OK. The node editor panel closes and the new node appears in the network panel but is not connected to any other node. Leave it unconnected for now.
- Repeat this process, if desired, to add other existing groups to the network.
To create a new search
- Click the Search button. The Search panel appears below the network panel. The Search panel doesn't have all of the features of the Search Tool, but it works the same way.
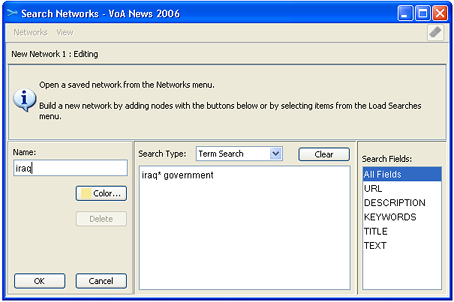
- From the dropdown list, choose a "Search Type", Term Search or Search By Example.
- Enter search terms in the search box. The same syntax rules apply as apply to a search from the Search Tool.
- From the list of Search Fields (at right), choose which field or fields to search.
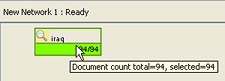
- Name the node, (optional) change the color of the node, and click OK. The node will be created, the edit panel disappear, and the network panel reappear again. The search will run, all of the documents found will be selected, and the new node will appear in the upper network panel. A tooltip explains that of the total number of documents in the node, that all of them are selected.
- If desired, continue by adding other Search nodes to the network. We will connect them together in the next step.
Connecting Nodes to Make a Network
Nodes can be connected with either "Combo" or "Subtract" nodes; with them, you can specify any area shown in the Venn diagram (above).
Combo Nodes
Combo or "combination" nodes add together the outputs of two or more nodes. To create a Combo node:
- Click the Combo button. The node editor panel opens.
- From the Source Node list, choose which nodes to combine. To choose ones that are contiguous, click on the first one, then SHIFT-click the other one, to select the range of groups from the first to the second. To choose non-contiguous ones, CTRL-ALT-click them.
- Specify which documents from the selected nodes should be in the combo node.
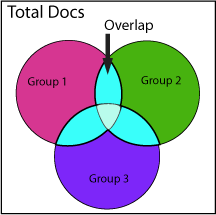
There are three possible ways to select them. Documents can be in:
- ANY source node (in at least one selected node)
- MORE THAN 1 source node (in any of the darker turquoise areas labeled "overlap" in the diagram), or
- ALL source nodes (only documents in the light turquoise area in the center of the diagram).
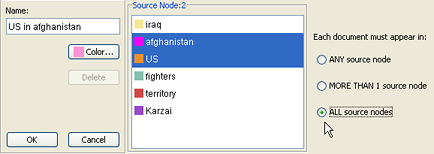
- Name the node, (optional) change the color of the node, and click OK. The node will be created, the edit panel disappear, and the network panel reappear again. Lines are drawn connecting the source nodes to the Combo node.
Subtract Nodes
Subtract nodes are the opposite of Combo nodes: They remove any overlap between nodes. To create a Subtract node:
- Click the Subtract button. The Subtract node editor panel appears.
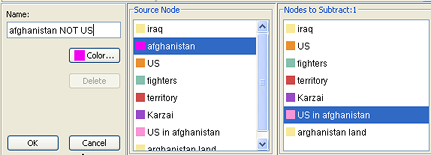
- From the first list, choose the "source" node, from which you want to subtract documents.
- There may be overlap between the "source" node and some of the nodes listed in the second "Nodes to Subtract" list. Select from this second list all of the overlapping nodes which you want to subtract.
- Name the node, (optional) change the color of the node, and click OK. The node will be created, the edit panel disappear, and the network panel reappear again.
Slice Nodes
To create a Slice node:
- Click on the Slice button. The edit Slice node panel appears.
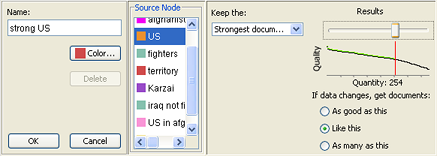
- On the right you will see a graph of document relevance. Move the Results slider to select the documents to retain; they will be drawn with a green line. Typically, the larger the number of documents retrieved from a search, the lower the quality; strive to set the cut-off at the "knee" of the curve, where the quality drops off.
- If yours is a "real time" dataset, where repeated searches will be run over changing data, choose one of the quality settings to apply if the data changes. If you merge the existing dataset with another dataset, this setting will also be used.
- Name the node, (optional) change the color of the node, and click OK. The node will be created, the edit panel disappear, and the network panel reappear again.
Editing a Node
Right-clicking on a node calls a menu of options, including edit, delete, etc. Which options are available will depend on node type. You can also double-click the node to open the node edit panel.
Exporting a Node to a Group
The documents that belong to a Search Networks node can be exported and added to another existing group. Doing this can be useful if you want to be able to edit the group, because Search Networks nodes, although they are groups, cannot be edited.
- Click
 button. The Export panel appears.
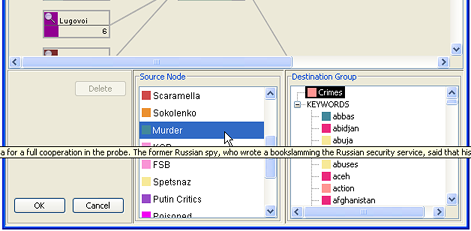
Mousing over an item in the Source Node list, which lists all of the nodes in the network, shows a tooltip of the search that underlies that node. Here we see a truncated search by example.
- Choose a Source Node.
- Choose a Destination Group from the list of all existing editable groups.
You are not allowed to create a new group from this panel.
- Click OK. The documents in the Source Node are added to the Destination Group.
Managing Networks
Search Networks can be renamed, copied, deleted, and shared among other IN-SPIRE users. See Managing Search Networks for how to manage search networks.