![]() Video tutorial available.
Video tutorial available.
The Galaxy window appears when you initially open a dataset from the Projects window. You can also open a Galaxy by clicking on the Galaxy  button on the IN-SPIRE main toolbar or from the main menu, select Tools > Galaxy.

The Galaxy is a plot of all of the documents in the dataset, showing the topical relationships between them. Proximity implies relatedness. Each document is represented by a dot, and the closer together two documents are plotted, the more similar is their topical content.
In the Galaxy, the following symbols are used to show document status:
|
|
An unselected document. |
|
|
A selected document. |
|
|
The document that is currently readable in the Document Viewer. |
|
|
A document that has been previously viewed in the Document Viewer but which is not now selected. A selected document that has been previously viewed is represented by a green "x". |
|
|
Documents that have been grouped with Groups. In the Galaxy, a grouped document will be shown in the color of its group. |
|
|
Document title or file name shown by selecting a document with the +Ti (Titles) cursor. If the document is selected, the title will be green, as shown here; otherwise, the title will be the peak label color (usually white). |
|
|
Topics strong in this area of the Galaxy. |
|
|
A cluster centroid. |
|
|
Probe arrow and resulting label. |
Colors of many IN-SPIRE system items can be adjusted to suit your preferences and may vary from the examples shown above.
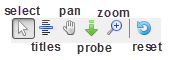
To work with the Galaxy visualization, you can use the IN-SPIRE toolbar, the Galaxy toolbar, and the Color Chooser menu (for display options).
In addition to the methods below, the Galaxy also honors the keyboard shortcuts outlined in selecting items from a visualization.
|
|
To select documents individually
To select all documents in an area
|
|
To show Grouped documents in their group colors
To group some documents
|
|
Showing Document Titles |
|
|
|
To be able to see document titles in Galaxy, click the Titles button and use the titles
To clear (hide) a document title
|
|
|
To hide all document titles Click Reset All. |
Showing What Terms Occur in an Area of the Galaxy |
|
|
|
To see a list of terms and their frequency of occurrence in a particular area
|
Working with Clusters |
|
|
A cluster centroid represents the mathematical center of the plot of all the documents that have been clustered together. To get oriented in a new dataset, it may be helpful to turn on cluster centroids. To show/hide cluster centroids
To turn off centroids, select Settings Moving the mouse over a cluster centroid will highlight the documents in the cluster without selecting them. To add the documents in the cluster to the selected document set, CTRL-click on the cluster centroid. To remove the documents from the selected document set, ALT-click on the cluster centroid. |
|
Homing in on Areas of Interest |
|
|
|
To zoom in
To enlarge an area of the Galaxy
To zoom out
To reset to the original magnification, selections, or titles
|
|
|
To revert to the default view options
|
|
|
To pan the view
To reset to original view coordinates, without affecting selections, or titles
|
From the IN-SPIRE main toolbar choose Edit > Color Chooser. For how to use the color chooser, see Color Chooser.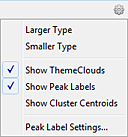
ThemeClouds are the blue areas which indicate areas of document concentration, and by default they are visible. Turn them off or on by choosing Settings > Show ThemeClouds.
Peak labels correspond to the labels on the peaks in ThemeView Classic. They are visible by default. If Peak Labels have been turned off, choose Settings> Show Peak Labels to turn them on.
Peak labels can be changed to a larger or smaller type. To increase the text font size of peak labels, choose Settings> Larger Type. To decrease the text font size of peak labels, choose Settings> Smaller Type.
Peak labels are so called because they label the areas of document concentration in the Galaxy, which correspond to the peaks (and their labels) in Themeview Classic. The Peak Label settings, then, affect the number of labels and the number of terms in each label in both the Galaxy and ThemeView Classic. Choose Settings> Peak Label Settings from either the Galaxy (or ThemeView Classic) to change them.


 cursor to click on a document in the Galaxy.
 This does not toggle titles on and off. It just lets you turn them on/off individually.