You are here: Tools > Document Viewer > Document Viewer: Basics
Document Viewer: Basics
The basic functionality of the Document Viewer includes the ability to:
- Read the text of documents in the dataset
- See which documents have been read and which have not
- See the relevance of documents to the search which selected them
- See which documents have notes associated with them and which not
- See where search words are found in a document
- If lexical content has been measured, see which words from the lexicon occur in a document
- Search for and highlight any other words
- Annotate text
Using the Document Viewer, you can also
The Document Viewer is configurable:
- You can hide functionality that you aren't using (for example, the Notes panel) to give more space to the functionality that you do use
- You can hide and reorder columns
Getting Started
- Select one or more documents. Ways to select documents.
- From the IN-SPIRE main toolbar, click the Document Viewer
 button or, from the IN-SPIRE main toolbar choose Tools > Document Viewer.
The document viewer opens, with a list of all the documents you selected. The text of the first document in the list will be visible in the content pane.
Selection changes will be automatically propagated to the Document Viewer.

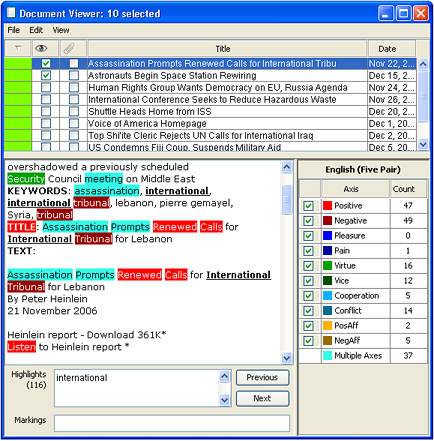
Parts of the Window
Numbers refer to the image above.
-
Selection or relevance score: The column furthest to the left in the default view shows selection (the background of the cell is the selection color, by default, green) and relevance (if the documents have been selected by a search).
-
Viewed column: If the content of a document has been displayed in the content pane (#4) then it is marked with a check mark in this column.
-
Notes column: If a document has a note attached to it, it is marked by a check mark in this column.
-
Content pane: This is where the text of the document is displayed.
-
Highlights pane: If a document was selected with a search, the search words appear here. They will be highlighted in the content pane also. You can type other words here and search for them in document text.
-
Markings pane: The marking for the document.
Basic Functions
Reading Documents
In the list of document titles, click on the name of the document you want to read. By default, it will be displayed with the original formatting. Sometimes, particularly with XML documents that contain a lot of markup, the original format is hard to read. If that is the case, deselect Settings > Original Format to make the text more readable.
Changing the "Viewed" Status of Documents
IN-SPIRE will keep track of which documents you have viewed since the time you opened the dataset by displaying a checkmark in the Viewed column of the Document Viewer.
Sometimes you will want to abandon the information about which documents you viewed during your current session. To change all of the documents viewed since the start of your current session to "not viewed", from the IN-SPIRE main toolbar, choose File > Clear Document Viewed Status.
Understanding "Document Relevance Score"
 If documents have been selected with a search, the background of the cells in the selection/relevance column will be green, indicating they are selected, and in addition there will be a gauge showing how relevant they are to the search. By default, documents are ordered in order of decreasing relevance. If additional documents have been added to the selection (they were not selected by the search but by adding documents to the selection in the Galaxy, for example), these documents will be selected but will not have a relevance score and will be listed below the least relevant document. By clicking in the column header, you can reverse the ordering.
 You may find reversing the ordering useful when you have done a Search by Example and are trying to establish a group of truly relevant documents by finding the cutoff. Work with Search's Search By Example slider to select more or less of the collection of hits, examine the result in the Document Viewer and when you have captured all relevant documents, create a group from them.
Finding Search Words in a Document
Search words will appear in the "highlights" pane and if a search word occurs in the content visible in the content pane, it will be highlighted. The two buttons at the right side of the pane (Previous and Next) are a quick way to move through a document from highlighted word to highlighted word. These buttons will be disabled if there is no previous or next highlighted word to be found in that document.
Previous and Next buttons operate within a single document.
After the lexical content of documents in the dataset has been measured (see Measuring with Lexicon for how to do so), then it is possible to see which terms from the lexicon occur in a document.
Searching and Highlighting Other Words
To search for a word or words in a document, without changing the current selection or searching the dataset as a whole, in the Highlight text box type the word you want to find and press Enter. If the word(s) is found in the document, it will be highlighted.
Finding Terms from the Lexicon in a Document
If the lexical content of the dataset has been measured, you can see which words in a document contributed to its scores on the different axes in the lexicon. Choose Settings > Highlights include Lexicon Terms. Uncheck Highlights IncludeL Lexicon Terms to hide the lexicon terms panel.
Which terms are highlighted in the content pane depends on which lexicon axes in the list are checked. The total number of highlights (on the highlights panel at the bottom of the window) here includes lexicon terms (counts for each are listed), and can also include search terms. The number of highlights can be overwhelming; turn off distracting lexicon highlights by unchecking axes. Turn off search term highlights by unchecking Settings > Highlights Include Search Terms.
Editing the Lexicon
From time to time, you will see a word in a document that either isn't in an axis and should be or which is in the wrong axis. It is possible to edit which axis a word is in, or add it to a new axis.
Adding a Word to an Axis
- Right click on the word in the content pane.
- Choose Lexicon Axes, and a list of the axes in the current lexicon will appear.
- The axes that are checked are those to which the word belongs.To remove a word from an axis, simply deselect its checkbox; to add a word to an axis, select its checkbox in the column at right. In the example above, the word that was right-clicked on was "Renewed", which is a member of the Positive axis, so this is the one that is checked.
After you have proposed a change to the lexicon and before the change is actually made, you will see a warning that lexicon term highlighting is out of date and giving you the opportunity to remeasure the dataset with the lexicon.
You will probably want to make all of your edits before remeasuring with the lexicon, which can be time-consuming.
Annotating Documents
You can add notes to documents as you view them. These notes can later be searched using the Search tool. See Searching Notes. By default, the Notes panel is hidden. To make it visible, choose Settings > Notes panel.
To add a note to a document you are reading:
Highlight the text you want to annotate.
Right-click on the highlighted area and from the drop-down menu select New, or
press CTRL-N, or
click the Add Note  button.

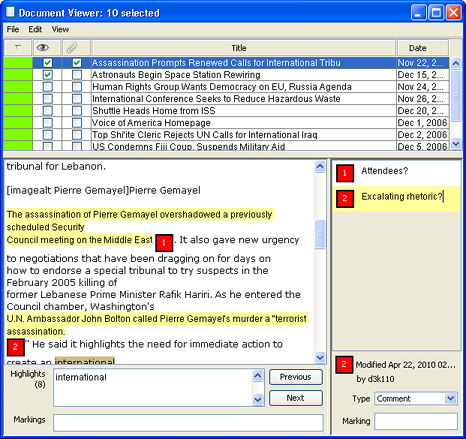
A red number will appear after the highlighted text, the highlighting will become yellow, and a new numbered note will appear in the Notes Panel.
If the Notes panel is hidden, highlighting text and creating a new note will open it. If the lexicon terms panel is visible, the Notes panel is inserted directly below it.
Click in the note in the Notes panel and type the text of the new note. The new note will be saved when you click elsewhere in the window.
Editing notes
To edit an existing note, open the Notes panel if it is not open, and click in the note you want to edit. The text it pertains to will be highlighted in yellow in the content pane, and will be editable. Edit the note in place, as desired. It will be saved automatically when you click elsewhere in the window.
Deleting notes
To delete an existing note, in the Notes panel, click in the note you want to delete. The text it pertains to will be highlighted in yellow in the content pane. Click on the Delete Selected Note button, or press CTRL-D. The note will be deleted.
Viewing the text to which a note pertains
Some documents are quite lengthy, much longer than can be viewed at a glance in the content pane. All of the notes will be listed in the Notes panel, however, and they can be used to quickly find the annotated text. Click on the note in the Notes pane to highlight the annotated text for it in the content pane, and to scroll the content pane to make it visible, if necessary.
Viewing the note attached to highlighted text
To highlight the note (in the Notes panel) that is attached to a section of highlighted text, and to scroll the Notes panel so that it is visible, click on the note number in the content pane.
Markings
The marking for the dataset can be set by an administrator; if you add a note to a document, you can enter the marking for it at the bottom of the Notes panel.
Configuring the Document Viewer for Your Convenience
Hiding Components You Are Not Using
These parts of the Document Viewer can be hidden, to simplify the window and to give more space to other components:
- Highlights pane
- Markings pane
- Notes panel
- Groups and Evidence Ratings
- Lexicon Terms Legend
All except Lexicon Terms Legend are listed on the Settingsmenu. Uncheck those that you want to hide. Lexicon Terms Legend is visible whenever highlights include lexicon terms. Select Settings> Highlights include Lexicon Terms to show the terms (and the legend).
Hiding Columns You Do Not Need
 You can also display only those columns that you want to see in the document table. To choose which columns to display:
Select Settings> Choose Columns... The Choose Columns dialog appears with a list of the default columns (Relevance, Viewed, Notes, Title, and Date) plus any fields that have been defined at dataset creation, including categorical fields. A categorical field is one which has a finite number of defined values, for example, countries, regions or languages. In the example, "KEYWORDS" is a categorical field.
Reordering the Columns in the Table
At any time, you can reorder the visible columns in the document table by clicking on a header cell and dragging the column to a new location.
Setting the Topmost Visible Line in the Content Panel
By default, the document text in the content panel scrolls to the title field defined on dataset creation; oftentimes this is TITLE:. It is possible to set a different "start line" by editing the inspire.ini file, which is found in IN-SPIRE's \DatasetRoot\config\app folder.