Welcome
Overview
Data Sets
Overview
Creating a Data Set
--ASCII Text
--XML
--Google Harvest
--Web Harvest
Settings
--Fields
--Stopwords
--Stopmajor Terms
--Punctuation Rules
Importing
Exporting
Merging
Subsetting
Visualizations
Galaxy
--Basics
--Outliers
ThemeView
Settings
Tools
Document Viewer
Gist
Groups
--Basics
--Evidence Panel
Major Terms
Queries
Print
Probe
Time Slicer
Groups Tool: Basics
Accessing the Groups Tool
| Click the Groups button on the toolbar, or | |
| From the Windows menu, choose Groups. The Groups Tool opens, with the Evidence Panel hidden. |
![]() To
create a group from within the Group Tool
To
create a group from within the Group Tool
See also All the ways to create groups (below).
- Select one or more documents. Ways to select documents.
- Click the New button. A group is created that includes the selected documents, and the Edit Group window opens, allowing you to change the default name and color assignment. The Groups list will display the name and the number of documents in the group.
![]() To
display member documents in the group color in the Galaxy
To
display member documents in the group color in the Galaxy
Highlight the group in the Groups List by clicking on its name. To highlight
several groups whose names are contiguous, click on the name of the first
group, then SHIFT-click on the last group. All groups between the first
and the last will be highlighted. To highlight non-contiguous groups,
CTRL-click each in turn.
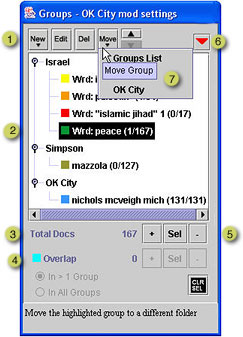
![]() The
total number of unique documents in all highlighted groups is the Total
Docs number.
The
total number of unique documents in all highlighted groups is the Total
Docs number.
![]() Overlap
includes documents that occur in more than one highlighted group; they
are colored turquoise in the Galaxy. Refine this collection by choosing
In > 1 Group to color as overlapping any documents occurring
in 2 or more groups, or choose In All Groups to color as overlapping
any documents which occur in all highlighted groups.
Overlap
includes documents that occur in more than one highlighted group; they
are colored turquoise in the Galaxy. Refine this collection by choosing
In > 1 Group to color as overlapping any documents occurring
in 2 or more groups, or choose In All Groups to color as overlapping
any documents which occur in all highlighted groups.
| Select buttons for Total Docs | |
| |
To add all documents in a highlighted group or group to the selection set. In the Galaxy, they will be colored the selection color. |
| |
To select only the documents in the highlighted group or groups. |
| |
To deselect all documents that occur in a highlighted group or groups |
| Select buttons for Overlap | |
| |
To add to the selection set only those documents which occur in more than one highlighted group, or all highlighted groups, depending on which radio button is on. |
| |
To select only those documents which occur in more than one highlighted group, or in all highlighted groups, depending on which radio button is on. |
| |
To deselect only those documents which occur in more than one highlighted group, or in all highlighted groups, depending on which radio button is on. |
| |
To deselect all selected documents. |
![]() To
view the documents in a group without selecting them and to use the Evidence
Panel's annotation tools
To
view the documents in a group without selecting them and to use the Evidence
Panel's annotation tools
Click ![]() to open the Evidence Panel. All
the documents in highlighted groups will be listed and accessible. Selected
documents are always visible in the Document
Viewer.
to open the Evidence Panel. All
the documents in highlighted groups will be listed and accessible. Selected
documents are always visible in the Document
Viewer.
To delete a group
Highlight it in the Groups list and click the Delete button.
To save groups
You need do nothing; groups are automatically saved when you close the
data set or exit IN-SPIRE. Choosing File > Save Session also saves
groups (as well as queries, viewed documents, and outliers).
All the ways to create a
group
Groups can be created from within the Group Tool, but also by
using Queries and the Document Viewer.
- Select the documents, then open the Group Tool. Click New and follow the instructions above for creating a new group.
- In the Query Tool (the documents are selected as the result of a query), click Group Results.
- In the Document Viewer (the documents are selected and visible in
the Document Viewer), from the Add to Group... dropdown menu
(located in the bottom 1/4 of the window), choose New Group.
 The Add to Group
dropdown menu remembers your last selection. If you have previously
chosen a group name from the list, you will see that, not "Add
to Group..."
The Add to Group
dropdown menu remembers your last selection. If you have previously
chosen a group name from the list, you will see that, not "Add
to Group..."
All the ways to modify an existing group by adding or subtracting members
- Using the Group Tool's Evidence Panel.
- Select the documents you want to add or subtract (see Ways
to select documents), and open the Document Viewer.
- From the Add to Group... dropdown menu (located in the bottom 1/4 of the window), choose the group to which you want to add/remove the documents.
- Click on a document in the list in the top panel.
- Click Add to add the document to the group; click Remove to subtract the document from the group.
To revert to last-saved groups, discarding the groups listed in the
Groups list
From the main menu bar's File menu, choose Restore Groups.
 Organizing
the Groups List
Organizing
the Groups List
Making folders
- Click the New button and choose Folder. A new folder with the name"New Folder" appears in the Groups list.
- To rename "New Folder", double click on it. A blinking insertion point appears in the middle of the word. Highlight and edit the name as you normally would. You can also click on "New Folder" (or any other folder or group name that you want to change) and click Edit. The Edit Group window opens. You can change the name or group color there.
- To move a group into a folder or to move a group from one folder to
another, highlight the name of the group and click the Move button
 .
From the dropdown list, choose the name of the folder to which you want
to move it.
.
From the dropdown list, choose the name of the folder to which you want
to move it.
Changing the order of items
Change the order of groups and folders by moving items up or down in the Groups list.
- Highlight the group or folder you want to move.
- Click up or down arrow
 to
move the item up or down in the list.
to
move the item up or down in the list.
To see helpful information about a part of the Groups
window
Hover the cursor over it. Information will appear in the Help panel at
the bottom of the window.