Data Sets
Overview
Creating New
--ASCII Text
--XML
--Google Harvest
--Web Harvest
Settings
--Fields
--Stopwords
--Stopmajors
--Punctuation Rules
Editing
Merging
Exporting
Importing
Subsetting
Visualizations
Galaxy
--Basics
--Outliers
ThemeView
Settings
Tools
Document Viewer
Gist
Groups
--Basics
--Evidence Panel
Major Terms
Queries
Print
Probe
Time Slicer
About version 2.2
Overview
Known issues
![]()
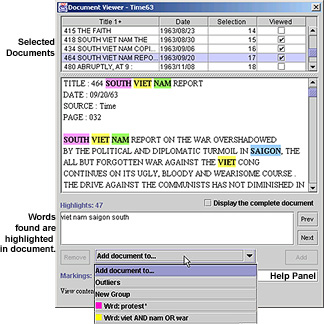
Document Viewer
Accessing the Document Viewer
| Click the Document Viewer button on the toolbar, or | |
| From the Windows menu, choose Document Viewer. |
To view a document:
1. Select one or more documents. Ways
to select documents.
2. Access the Document Viewer.
3. In the list of document titles, click on the name of the document you
want to view.
To view the entire document if the document is truncated:
Scroll to the bottom of the highlighted document. If the document
contains more lines than are displayed, you will see a note to that effect.
To view the entire document, click the Display the Complete Document
checkbox so that it contains a check.
To scroll up and down in the document list
In addition to the scrollbar to the right of the document list,
you can use CTRL-up arrow and CTRL-down arrow to scroll the document list,
displaying the document before or after the currently-displayed document
in the list.
To search for a word in the selected documents:
1. In the box below “Find Words in the Document:” type the word
you want to find.
2. Click the Find button. Each instance of the word in the displayed
document will be highlighted. It will also be highlighted in any other
selected document in which it is found. Click the title of a document
to display the document with search word hits highlighted.
- Click on the column header to sort documents in ascending alphabetical order (titles beginning with A will be at the top).
- Click on the column header again to sort documenst in descending order (titles beginning with Z will be at the top).
To see helpful information about a part of the Document Viewer window:
Hover the cursor over it. Information will appear in the Help panel at
the bottom of the window.
To add a document to an existing
Group
Click the Add to Group... dropdown menu and select the group.
Then click Add. If the document already belongs to the selected
group, the Add button will be disabled.
To remove a document from a Group
Click the Add To Group... dropdown menu and choose the
group, then click Remove. The Remove button will be disabled
if the document does not currently belong to the group you have selected.
Using Markings
Markings is enabled if you have special predefined document markings in
your data set. Contact your IN-SPIRE technical representative for more
information on this feature.
Setting the topmost visible line
By default, the document displayed in the Document Viewer's lower
panel is positioned so that the topmost visible line begins with the title
field that you defined when you created the data set; oftentimes this
is TITLE:. You can set a different "start line" by editing the
inspire.ini file, which is found in IN-SPIRE's \DatasetRoot\config\app
folder.